It's been a while since I've done any customs. Being busy working 7 days a week at 2 jobs and spending free time with my kids leaves little time to work on stuff. I've also had no real interest in customizing movie-styled toys, which is all there's really been the past few years aside from a CHUG-type figure here and there in a HftD/RtS/Generations line. I have some 'pipe-dream' scratchbuilds in progress/hiatus but in regards to plain, old repaints and what-not, I've not felt the need to do any. Most of the toys don't need to have every mold detail accentuated or be perfect, so those with the majority of the key coloring/details is fine with me.
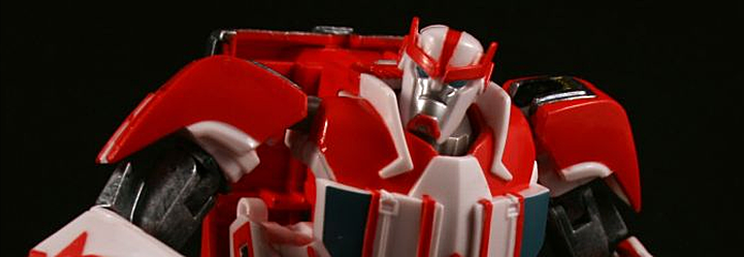
With that being said, TF Prime Ratchet was a slick little figure but was totally too white. Like a pale white guy out at the beach. He absolutely needed some extra paint. So after about 2+ months of work, here is my TFP Ratchet. I was able to practically 100% color match the stock red-orange color with about 50% Testors Guard Red and 50% Chrome Yellow, so I was able to leave the stock paint apps alone and touch up some areas without having to repaint the whole thing. I tried airbrushing some of him but most of him is hand brushed (you can tell by my crappy brush strokes on it).
I tried going for show accuraccy but made some concessions in regards to the EKG detail, doors on the rear of the cab and the stripe/rails on the top of the cab. I went more for a bot mode accurate design than alt mode. He doesn't transform as he does in the show, so it's impossible to mimick the EKG stripe. Since it needed to be on his arms, I continued the thick red stripe to form it rather than the upper thin one as on the CGI model. That and the arm stripes were a pain in the ass to do. I did the EKG stripe by laying down some artist crepe tape for the design and applying liquid mask over it and peeling the tape off. The shoulders were by hand. Both I had to go back and use the tip of an exacto blade to scrape away paint to get the right look and (mostly) sharp edges. I really was tempted to do the doors on the back of his cab but left them just red, more towards a bot mode accurate look.
Other hightlights include:
* Dry-brushed details - Aluminum over Gunmetal base-coat for lights, rear bumper, sun visor, upper arms, thighs, crotch, abs, knees and toes. Aluminum rims.
* Lights are clear red/yellow over drybrushed base. Extra Aluminum paint was used to try and simulate clear lights on rear/side and top lightbar.
* CGI accurate Gunmetal details in abs & crotch
* CGI accurate white stripe on front side panels
* CGI accurate chest & shoulder detail
* Added mostly CGI accurate red paint app detail to front bumper, head, collar, shoulders, arms, back/backpack, chest/abs, inner thighs, inner calves, knees, toes
* Used package CGI for refernce on paint app detail on the swords
* Key areas coated in a few coats of Future/Pledge to try and prevent paint scraping (though, I don't know what you can really do to prevent it on the backpack areas. lot of stuff moving/touching around there.)
2+ months seems like a lot of time but with maybe an hour or so every couple of days to do all the above detail takes a while to finish. I also made a second one to put on eBay, which I suppose doubled the time needed. I'm still working out how to take good photos (can't seem to get Depth of Field right no matter the F-stop to get everything in focus) but they're not too bad.
I'm also making a custom box package for the one destined for eBay. It's styled from the First Edition packaging. I haven't made the physical box yet but attached is the layout in Photoshop. It's built around the plastic tray he comes in from the RiD package, so about 6.75" square, 2.75" deep.
Next up will hopefully be Knockout, as he's lacking his signature yellow highlights and needs some lovin' too. Thanks for looking and for your comments! (and sorry for the lengthy novel of post)


